
Jetpack Compose is the future of Android UI, but many apps still rely on XML-based layouts. Instead of rewriting everything from scratch, you can gradually integrate Jetpack Compose into your existing project. This guide’ll show you how to embed Jetpack Compose inside XML layouts and create a dedicated Compose-only activity.

Watch Step-by-step video tutorial:
Step 1: Setting Up Jetpack Compose in Your Project
Add Dependencies
Ensure that your project has the latest Jetpack Compose dependencies in the build.gradle file:
dependencies {
    implementation "androidx.activity:activity-compose:1.7.2"
    implementation "androidx.compose.ui:ui:1.5.0"
    implementation "androidx.compose.material:material:1.5.0"
    implementation "androidx.compose.ui:ui-tooling-preview:1.5.0"
}Enable Compose Compiler
Add the following block inside your build.gradle file:
android {
    composeOptions {
        kotlinCompilerExtensionVersion '1.5.0'
    }
}Sync the project to apply the changes.
Step 2: Embedding Jetpack Compose Inside an XML Layout
Modify Your XML Layout
Wrap the Compose content inside a ComposeView in your XML layout:
<androidx.compose.ui.platform.ComposeView
    android:id="@+id/composeView"
    android:layout_width="match_parent"
android:layout_height="wrap_content"/>Connect ComposeView with a Composable Function
class MainActivity : AppCompatActivity() {
    override fun onCreate(savedInstanceState: Bundle?) {
        super.onCreate(savedInstanceState)
        setContentView(R.layout.activity_main)

        val composeView = findViewById<ComposeView>(R.id.composeView)
        composeView.setContent {
            MyComposeContent()
        }
    }
}Step 3: Creating a Compose-Only Activity (if required)
Create a New Compose Activity
Go to File → New → Activity → Empty Compose Activity. Name it ComposeActivity.kt.
Define the Compose UI in the Activity
class ComposeActivity : ComponentActivity() {
    override fun onCreate(savedInstanceState: Bundle?) {
        super.onCreate(savedInstanceState)
        setContent {
            ComposeScreen()
        }
    }
}

@Composable
fun ComposeScreen() {
    Box(modifier = Modifier.fillMaxSize(), contentAlignment = Alignment.Center) {
        Text(text = "This is a Compose-only Activity!", fontSize = 22.sp)
    }
}Fixing Jetpack Compose Compatibility Errors

If your app runs fine in debug mode but crashes in release mode, it may be due to an incompatible Compose compiler version.
Verify that the Compose compiler version matches your Kotlin version.
Check Kotlin and Compose Compiler Versions
- Open
build.gradleand check the Kotlin version. - Visit the Jetpack Compose Compiler Compatibility Map.
- Find the correct Compose compiler version for your Kotlin version.
- Update
build.gradlewith the correct version:
composeOptions {
    kotlinCompilerExtensionVersion "1.5.0"
}Final App Preview
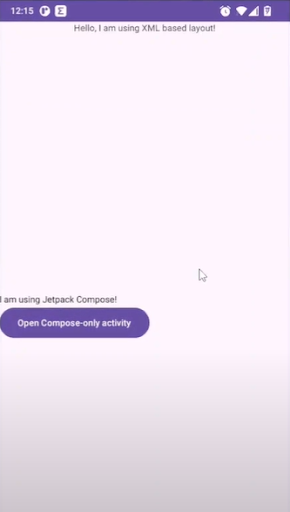

- The top part of the screen is XML-based.
- The bottom part is Jetpack Compose inside an XML layout.
- Clicking the button navigates to a Compose-only activity.
Start integrating Compose into your app gradually and experiment with different components to modernize your UI step by step.